![]()
![]()
To access a video, right-click on the hyperlink and select Open in new window.
Creating Tiered Fees Video - This video shows how to create tiered Management Fee settings.
Basic tiered fees allow you to charge a unique percentage-based fee for differently sized accounts. With just one fee setting, you can change the amount charged based on the size of an account.
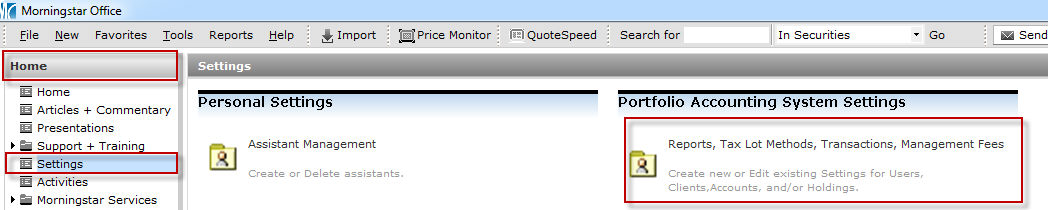
Go to the Home tab.
Click the Settings page.
Under the Portfolio Accounting System Settings area, click Reports, Tax Lot Methods, Transactions, Management Fees. The Settings dialog box opens
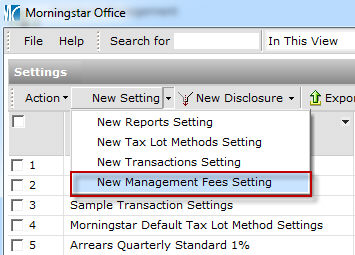
On the icon bar above the spreadsheet area, click the arrow to the right of the New Setting button and select New Management Fees Setting. The Management fee setting dialog box opens.
| Field Name | Instructions |
| Setting name | Enter a name for the management fee setting. This does not appear on any reports; it is only for internal use. Most advisors choose a descriptive name. For example, “Standard Tiered Fee.” |
| Billing Method | Tiered Fee should be chosen by default. |
| Bill Rate Methodology |
Select either Actual/Average or Actual/Actual. With Actual/Average, the annual fee is multiplied by (1/4) to calculate a quarterly fee, (1/12) for a monthly fee, etc. (The frequency of payment is selected in the Payment Period field.) With Actual/Actual, the annual fee is multiplied by X divided by 365 (where X is the actual number of days in the billing period) to calculate the fee. For example, with a quarterly fee, in the second calendar quarter a flat fee of $1,000 would be multiplied by (91/365). |
| Billing By |
You can bill by either an account’s Total Portfolio Value, or Security Type. If you select Security Type, you will need to add Billing Categories. (The interface will change to provide this option.) |
| Single Rate |
If this box is checked, a single billing rate is applied based on the entire market value of an account. If the box is left unchecked, each account’s value is divided into tiers, with each tier billed at a progressive rate. For example, if you have the following three tiers:
and an account has a value of $1,500,000, you can charge a single rate for the entire amount (if the box is checked), or (if the box is unchecked) charge a rate for the first $250,000, another rate for the amount between $250,000-500,000, and yet a third rate for the final $1,000,000. |
| Payment Period |
This field determines the billing time period. The options are Quarterly, Monthly, Semi-annual, Annual or Custom Period. If Custom Period is selected, the client can be billed in either 2- or 4-month periods. |
| Payment In |
Select Calendar Period or Rolling Period. With Calendar Period, accounts are billed on the last day of the month/quarter, according to conventional calendar periods. With Rolling Period. accounts are charged on a date of your choosing. Quarter start and end dates follow your custom schedule. |
| Next Period Start Month (Rolling Period Only) |
This field is used only when the Payment In field is set to Rolling Period. It determines the month when the next period in the cycle begins. For example, if the next billing period begins on February 15, select Feb. |
| Next Period Start Date (Rolling Period Only) | This field is used only when the Payment In field is set to Rolling Period. It determines the day when the next period in the cycle begins. For example, if the next billing period begins on February 15, select 15. |
| Bill In | Choose either Advance (to bill on the last day of one time period for the next time period), or Arrears (to bill on the last day of one time period for the same time period). |
| Using | Select either End Balance (as of the last day of the billing period), Daily Average Balance (over the entire billing period) or Month End Average Balance (for each month in the billing period). |
| Proration |
Check this box to enable the following proration options:
You can prorate the amount charged for either new accounts entered in the middle of a billing period, or for money flowing in and out of accounts during a billing period. While prorating is optional, it is always recommended. Otherwise, you could find yourself overcharging (if billing in arrears) or undercharging (if billing in advance). You could account for these differences by making manual adjustments, but this creates a lot of additional work which can be avoided by prorating. |
| New Account |
When this box is checked:
|
| Cash Flow | When this box is checked, clients are discounted for the days when their accounts had a lower balance, and charged more for the days during which their accounts had a higher balance. |
| Min. Flow for Proration | Select either Amount or Rate % required to trigger the proration, then enter that value in the field below the option buttons. |
| Prorate | This field is used only when the Cash Flow box is checked. You can select either In flow or All flow to choose to prorate for inflows only, or to prorate for both inflows and outflows of cash. |
| Rebate Transaction Commissions | When this box is checked, any commissions you have earned over the quarter are subtracted (data drawn from transaction history). |
| Rebate Transaction "Other" Fees | When this box is checked, any transaction fees or other expenses that the client paid to other parties (not the advisor) are subtracted. |
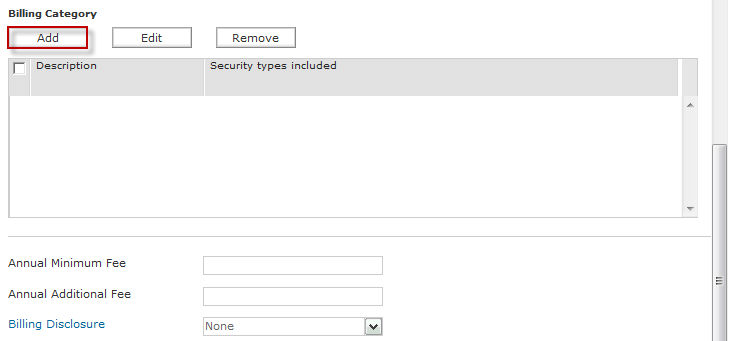
| Fee Tier |
In the Fee Tier fields, you need to enter values in the To(USD) column for each tier. The From(USD) column will update automatically with the value in the To(USD) field from the previous row. After entering a value in the From field, you need to enter either a Firm Fee %, Advisor Fee %, or both, depending on how your firm’s fees are structured. The value of these two fields is totaled in the Annual Rate % field. The Firm Fee is the annual percentage paid to your firm, brokerage house, etc. The Advisor Fee is the annual percentage paid to you. |
| Annual Minimum Fee | Enter a dollar amount here to ensure that a certain annual minimum fee is charged to an account. |
| Annual Additional Fee | If you need to charge an additional flat fee along with the tiered fee, enter that amount here. |
| Billing Disclosure | If desired, select a custom disclosure to appear on the Billing Summary. You must have already created and saved a billing disclosure before you can select it here. See “Creating a Billing Disclosure” on page 18. |
| Exclude Accrued Interest | Check this box to exclude accrued interest from bonds in the billable balance of your accounts. |
| Management Fee Deductible from Custodian Account | This check box determines the content of your billing summary. If the box is checked, the billing summary will show that the client owes nothing because fees are deducted automatically. If the box is unchecked, the Billing Summary will show a balance due. |
How do I create a security-based tiered fee?
Security-based tiered fees allow you to create different sets of fee tiers for different security types. Fee tiers are assigned based on the amount of each security type held, not based on the overall size of the account.
To create a security-based tiered fee, do the following:
Follow steps 1-4 above.
In the Billing Method field, be sure Tiered is selected.
In the Billing By field, select Security Type.
In the Billing Category area, click Add to create a security category. The Management Fee Tiers dialog box opens.
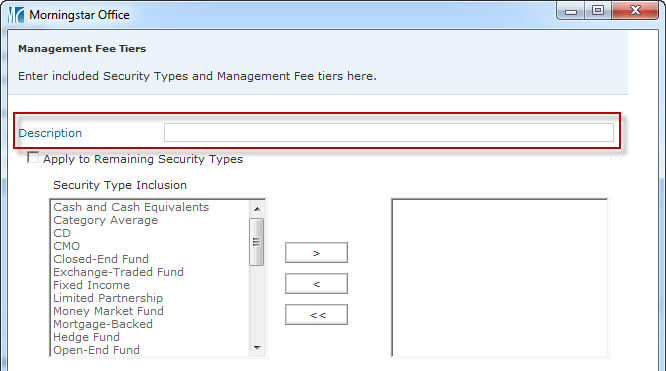
Select the security type(s) to be included by clicking on items in the Security Type Inclusion area and then clicking > to add them to the final list
When your list is complete, enter Fee Tier breakpoints and fee amounts for the item(s).
Click Save/Exit.
Repeat steps 4-8 until you have accounted for all security types.
Note: To include all remaining securities in a billing category, check the Apply to remaining security types box. Securities types not included in a tier will not be billed.
When you are finished, click Save + Close on the Management Fees dialog box.