
Morningstar has provided a PDF document that can be sent to your clients once the Client Web Portal has been turned on. To save the PDF to your computer, right-click on the link and select Save Target As.
System Generated Password (requires the client to set the password): http://advisor.morningstar.com/AWSOE/Training/CWPClientInstructionsSystemPassword.pdf
After you have configured the features and appearance of the CWP, you can address the administrative functions of the tool. You must grant access to the CWP for each client individually; it is not enabled by default. Before granting access to the CWP for a client, you should consider the following questions:
What e-mail address should I use for a client to log into the CWP?
What password will the client use to log into the CWP?
What do I do if I accidentally enter the wrong e-mail address for a client?
This section explains how to do the following:
What e-mail address should I use for clients when they log into the CWP?
When setting up a client for access to the CWP, you will enter an e-mail address for the client to use to log in to the CWP. In addition to being the login for the CWP, this e-mail address will also automatically receive notifications when you post items to the CWP.
Note: if the client has a different e-mail address in the Client Profile->General area, that e-mail address, and not the CWP e-mail login, will receive the CWP notifications.
Can other e-mail addresses receive a notification when I post content to the CWP?
You can also enter additional e-mail addresses for clients or related parties to receive a notification when a new item is posted to the CWP; be sure to separate these addresses with either a comma or a semicolon.
Note: these e-mail addresses are only CC'd on the notifications; they cannot be used to log in to the CWP.
How do I designate someone to receive an e-mail when I post content for a group?
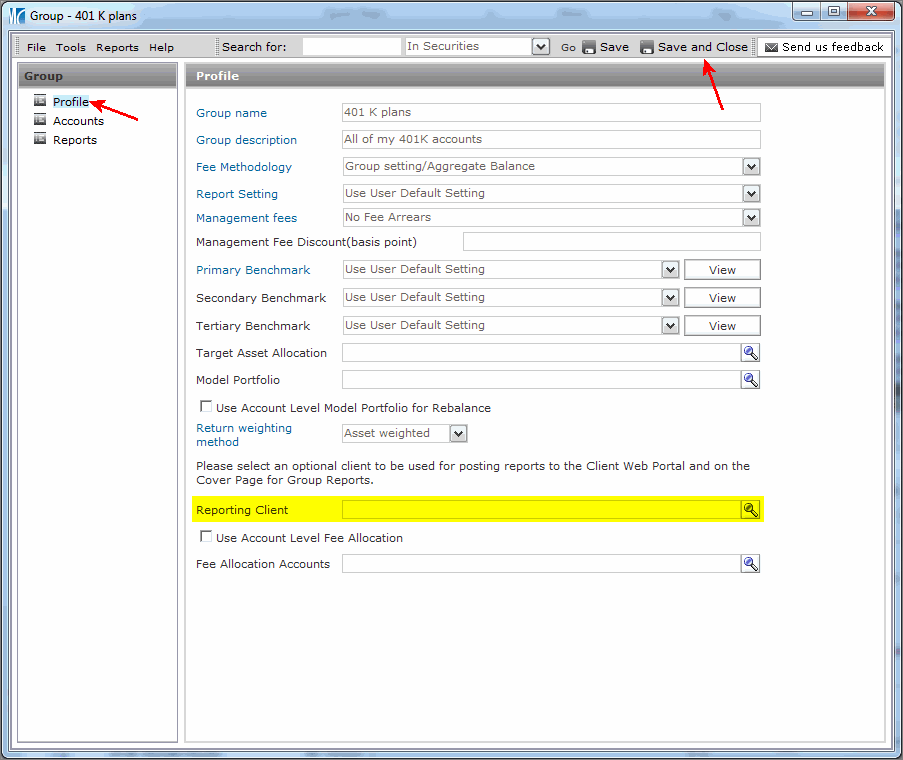
If you have a group record, you can designate a Reporting Client to be the recipient of the e-mail that is sent when content (i.e., reports) is posted for that group. This client will also see reports for the group on the CWP.
This is a handy trick to use when you want to ensure someone who is not the owner of an account can still see reports for that account. For example, you might have separate client records for a husband and wife who own a trust. If the account for the trust is under the husband’s client record, you can add the account to a group, then designate the wife as the Reporting Client for the group. This way, the husband will be able to see reports for the account because it is associated with him, and the wife will be able to see reports for the account, because she is the designated Reporting Client for the group.
To establish a Reporting Client for a group, do the following:
From the Portfolio
Management tab, select the Groups
page.

Double-click the group you want to work with. The Groups window opens.
Select the Profile page.
In the Reporting Client field, type the name
of the client you want to designate for this group.

At the top of the window, click Save and Close.
Can I change the e-mail address for clients after I register them for the CWP?
After you submit the CWP setup for a client in Morningstar Office, you cannot change the e-mail address a client uses to login to the CWP. If a client wants to change the e-mail address used to log into the CWP, the client needs to login into the CWP and use the Settings button.
When the client changes the e-mail address entered there, it will automatically pull through to Morningstar Office, and you will see it reflected on the Client Web Portal set up page.
How does the client set a password for the CWP?
When you grant a client access to the CWP, the client is required to set their own password and must adhere to the guidelines below.
If your client sets a weak Web Portal password, they will receive a notification to change it. The minimum standards for a password are:
8 or more characters long containing
no more than 2 identical characters in a row, and
at least 3 of the following conditions
1 lower case letter (a-z)
1 upper case letter (A-Z)
1 special character (e.g., ?, $, %, !, @, #, etc.)
1 number (1-9)
Morningstar has provided a PDF document that can be sent to your clients once the Client Web Portal has been turned on. To save the PDF to your computer, right-click on the link and select Save Target As.
System Generated Password (requires the client to set the password): http://advisor.morningstar.com/AWSOE/Training/CWPClientInstructionsSystemPassword.pdf
How do I grant access to the Client Web Portal?
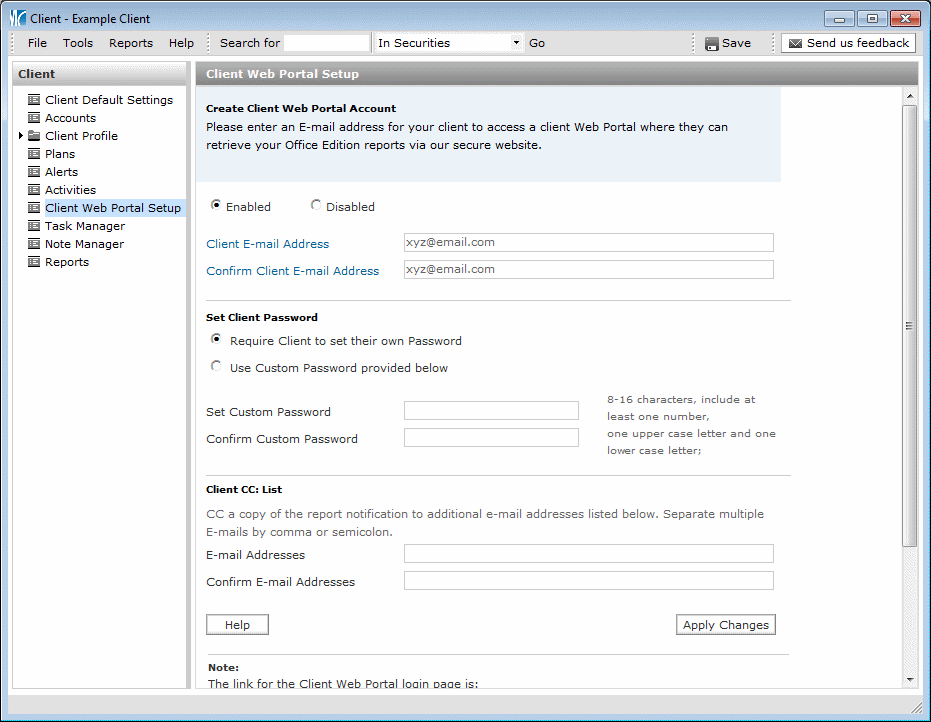
Access to the CWP can be granted for only one client at a time. To give a client access to the Client Web Portal, do the following:
In the left navigation pane, click Client Management, then be sure you are on the Clients page.
Double-click on the client you want to grant CWP access to. The Client window opens and you will be on the Account page.
In the Client window, click Client Web Portal Setup.
Select the Enabled option button.
In the Client E-mail Address field, enter the client's e-mail address.
Re-enter the client's e-mail in the Confirm Client E-mail Address field.
Important Note: Be sure this is the correct e-mail address for the client before you click Submit. You will not be able to change this e-mail address once you submit it. If you mistakenly submit the wrong e-mail address, disable that e-mail address and contact Customer Support to reset the login.
Select an option under the Set Client Password area. Note the following options for this feature:
you can require the client to set his/her own password,
you can enter a custom password for the client.
If you opt for either the first or third option, note that the CWP password must contain between 8-16 characters, include at least one number, one upper case letter and one lower case letter.
Optionally,
in the Client CC: List area,
enter and confirm additional e-mail addresses for related parties
to also be able to receive a notification when content is posted to
this client's CWP.

Click Apply Changes. The client (and any additional e-mail addresses you entered) will be sent a link to the CWP.
How do I disable access to the Client Web Portal?
Once you establish an e-mail address for a client, you can both disable and re-enable their access to the CWP, but if a client wants to change their CWP login (e-mail or password), they need to do this by clicking the Settings button within the CWP.
You cannot change the e-mail address for a client once it is submitted. If you mistakenly submit the wrong e-mail address, you should immediately click the Disable button to disable access, remove any reports from the CWP for that client, and contact Customer Support (866-215-2503) to reset the login for that client.
To disable a client's access to the Client Web Portal, do the following:
In the left navigation pane, click the Client Management tab, then be sure you are on the Clients page.
Double-click on the client for whom you want to disable CWP access. The Client window opens and you will be on the Accounts page.
In the Client window, select the Client Web Portal Setup page.
Select
the Disabled option button.

Click Apply Changes. A dialog box appears, asking if you are sure you want to disable the client's access.
Click OK. Be sure to contact Customer Support (866-215-2503) to have the login reset for the customer.
 See Also
Configuring/Designing the Client Web Portal
Posting Content to the Client Web Portal