![]()
![]()
The first step in using the Client Web Portal (CWP) is to determine what your clients will see when they log into it. The same window in Morningstar Office that allows you to design the appearance of the CWP and configure its component parts also allows you to perform certain administrative functions. Understanding these key functions is crucial to making the CWP experience an efficient and easy one for you and your clients.
Click on a link below for additional information on the following:
how each option in the CWP Settings window affects what you and your clients see on the CWP, and how the settings can be used to share information between you and your clients.
Understanding the Overview Tab
Understanding the Investments Tab
Understanding the Account Detail Tab
Understanding the Document Tab
Understanding the Notification Tab
Understanding the Disclosure Tab
Understanding the Electronic Delivery Consent Tab
In Morningstar Office, you can upload your company logo to your user preferences so it appears on any report generated for your clients. As an added bonus, this uploaded logo also appears on your clients' web portals.
Note the following important points about your logo:
Your company logo must be in JPEG or GIF file format
It cannot exceed 265.5 pixels by 100 pixels (logos larger than these dimensions will be resized down), and
The company logo file should be saved to a location on your computer.
To display your company’s logo on cover pages and the CWP, do the following:
On the Home tab, select the Settings page.
From the Settings page, click once on
Preferences. The Account Setting
dialog box opens.
In the Account Setting dialog box, click
the magnifying glass next to the Add
Logo to Cover Page field. The Open dialog box opens.

Locate the company logo file on your computer, then click Open.
After your logo uploads, click Save and Close on the Account Setting
dialog box. Your company’s logo will now appear in the center of your
clients' web portals.

To configure the appearance of the CWP for your clients, do the following:
From the Home tab, go to the Settings page.
From the Settings page, click once on
Client Web Portal Settings.
The CWP window opens.
Firm-level settings are used to ensure that every member of your firm has an identical CWP. This can be set by checking the Use Firm Level Settings box at the top of the Overview tab, but be forewarned: if this box is checked, any firm member can change the appearance of the CWP for all firm users by subsequently making a change in the CWP Settings window.
The Overview tab lets you set the options clients will see when they log into CWP. This page acts as a dashboard providing high-level information at a glance. If you want this page to show on the CWP, check the box labeled Enable Overview section on Web Portal.
The Overview tab allows you to include different sections by selecting or deselecting each element.
The Display Return Information enables performance information to be included in CWP data points and charts.
The Display Net Investment Information enables the Net Investment data point to display. Once selected, select Display Additions and Withdrawals to include those data points.
The Display Net Worth Information enables asset, liability, and insurance data points to display.
To determine the date for the information shown on the CWP, select one of the following options from the As of Date for Data drop-down field at the bottom of the Overview tab:
Last Month End
Last Market Close
Note: This selection affects all information displayed on the CWP.
The table below provides details on each section available on the Overview tab.
Component |
Contains this information |
Aggregate Investment Performance and Top Holdings |
Investment information including the following:
Asset Allocation chart and top allocated holdings |
List of Accounts |
Account balances for each underling account within your clients' portfolio |
List of Recent Documents |
Links to folders and documents most recently posted by you |
The Investments tab lets you set options for investments within your clients' portfolio. If you want this page to show on the CWP, check the box labeled Enable Investment section on Web Portal.
The Investments tab allows you to include different sections by selecting or deselecting each element.
The Display Benchmark Returns enables the How much have my investments grown? section to compare My Investments to an established benchmark.
The Display Return Information enables performance information to be included in the Which of my accounts are included? section.
The Display Net Investment Information enables the Net Investment column to display in the Which of my accounts are included? section. Once selected, select Display Additions and Withdrawals to include those data points. These data points will display in the header of the Investments page.
The top section of the Investment page includes data points and graphs showing how investments are performing. the bottom section includes limited details about the accounts constituting your portfolio.
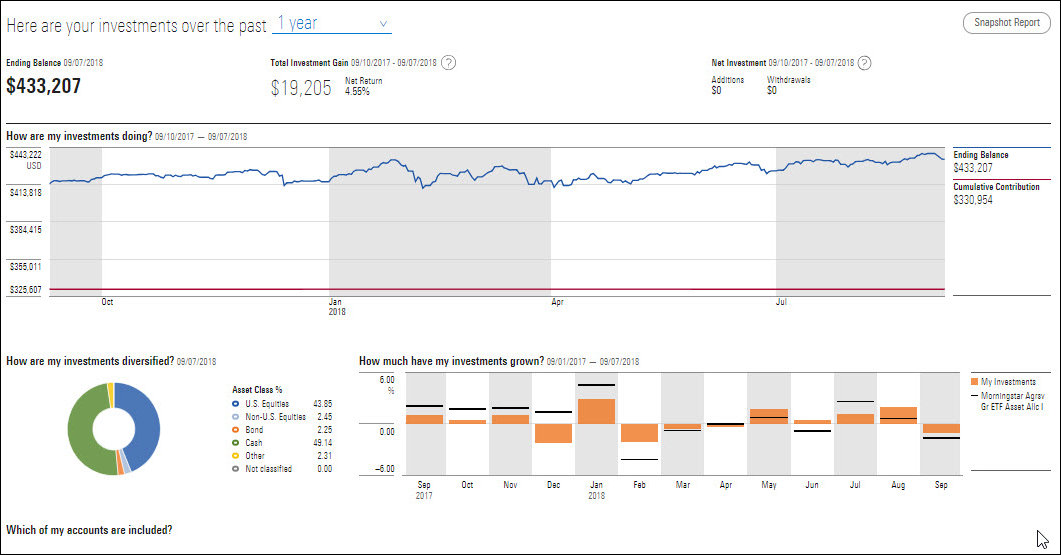
The table below provides details on each section available on the Investments page.
Component |
Contains this information |
Filter for Time Period |
From the Investments page, your clients have the ability to select their time frame for data. Choose from the following options:
|
Aggregate Investment Growth Chart How are my investments doing? |
This line chart shows how the value of your portfolio has changed over the time period you have chosen. It also includes a cumulative contributions line. Click anywhere on the line to see an exact figure for a specific month. |
Aggregate Pie Chart How are my investments diversified? |
This chart shows what percentage of your investments fit into each asset class. |
Aggregate Performance Bar Chart How much have my investments grown? |
This chart shows how your investments have performed over the time period displayed. |
List of Accounts Which accounts are included? |
This table includes the accounts comprising your portfolio, along with limited details about each account. Click on the icon next to each account to open the Account Details page for transactional accounts only. Each Account Details page contains the same content as the Investments page, however, a list of holdings replace the list of accounts at the bottom of the page. Click on any holding to launch the Morningstar page. |
Other Investment Accounts |
Quick accounts that you are not managing, such as a 401(k) account or other held-away assets. |
The Account Details tab in the CWP enables the account details page for each transactional account within a clients portoflio. If you want this tab to show on the CWP, check the box labeled Enable Account Details Tab.
When the Account Details tab is enabled, it works in conjunction with the Investment page on the CWP. Under the section titled Which accounts are included?, click on the arrow at the end of the line item for a transactional account. The page is reloaded showing a new section called Which securities are in this account? From there, you can click on the arrow at the end of the line item to see the Detail report.
The Document tab allows you to do the following for the CWP:
decide whether clients can upload files to the CWP
decide whether client files should be automatically posted to the CWP when they are uploaded
determine which types of files clients can upload to the CWP
select a folder for client files to be stored in when they are uploaded to the CWP (you must have already created this folder on the Reports tab in Morningstar Office), and
decide whether the report folders you create in Morningstar Office (for housing the reports you generate) should be displayed on the CWP.
The Display Document Manager must be checked to enable the Documents link on the CWP.
First, decide whether you want to allow clients to post their own files to the CWP. This allows them to both share files with you, and use the CWP as a single place of reference for investment-related items. To allow clients to post documents to the CWP, check the box labeled Allow Clients to upload documents via the Web Portal. Rather than have every client file posted immediately, you have the option of reviewing this material. This rule must apply to all users, and can also be used to prevent sensitive material from inadvertently being posted by a client.
When a client submits a new file to the CWP, you will receive an e-mail alerting you to this.
The next option allows you to specify the types of files to clients are allowed to upload. Note that a distinction is made between .xls and .xlsx, and .doc and .docx files. This is because more recent versions of Microsoft Excel and Word save files with an .xlsx and .docx extension, respectively.
When a client uploads a file to the CWP, a record is created in Morningstar Office. You can see those records on the Reports tab, on the Usage Reports page. Further, you can create a sub-folder on the Reports page to house all of the files your clients upload to the CWP.
If you have already created such a folder, you can select it on the Document tab from the Select folder where uploaded documents will be saved: drop-down field.
If you have not already created this folder, do the following:
From the Reports tab, select the Reports folder.
Right-click the Reports folder
and select New Folder.
The New Folder dialog box opens.
In the New Folder dialog box, type a
Name for the folder to which
your clients' uploaded documents will go.

Click OK.
Be sure to select this folder from the Document tab in the Client Web Portal Settings window.
Finally, not only can you designate a folder to which client submissions will be posted, you can also choose to have the folders you’ve created be posted to the CWP. For instance, if you create a separate folder for each set of quarterly reports you create, you can display those folders on your clients’ CWP, to make it easier for them to find the files you post.
To display these folders, simply check the box at the bottom of the Document tab labeled Display report folders on Web Portal.
The Notification tab allows you to enter a default message in the e-mail your clients receive whenever you post a file to their CWP.

Note the following important points about this tab:
Your message can be up to 600 characters. Your name and your firm’s name will be included by default, so you don’t need to include those in the message you write. However, it is recommended that you include a link to the CWP (fp.morningstar.com) in the message.
You can use a default signature as well. Click the icon to the right of the Use default email signature for automatic notification e-mails to configure your signature.
You can disable notification e-mails for when you post reports, as well as the e-mail your clients receive when you first enable the CWP for them. You can also disable the notification you receive when a client uploads a file to the CWP. Of course, if you disable this setting, you will need to be diligent about monitoring the Reports page on the Reports tab to see when these files are uploaded.
The Disclosure tab is optional, but it allows you to create a message (of up to 4,000 characters) in the footer area on the CWP. You can also decide whether to show the Morningstar logo in the footer as well.
The following are examples of what you could type in the footer area of the CWP:
This is a secure site.
Files are uploaded on a quarterly basis.
For questions regarding the content of these reports, please call aaa-ppp-xxxx (your firm's phone number).
The Electronic Delivery Consent tab is also optional. It allows you to force clients to accept a consent agreement before viewing the CWP, even if they have previously logged into it.
If used, this tab will present a message to clients the first time they login to the CWP after you have either enabled this option, or posted a new version of the consent.
Note the following important points about writing a consent script:
You can create multiple scripts, but only the latest version will show.
You cannot edit or delete a previous version of the script.
To create a new version of the Electronic Disclosure Consent page, do the following:
On the Electronic Delivery Consent tab, click Add New Version.
In the text area to the right, type your message.
If you realize you do not need this content, click the Discard New Version button.
Click Save.
 See Also
Administering the Client Web Portal
Posting Content to the Client Web Portal